
Introduction
Hugo is a fast and reliable static site generator written in Go. Designed for performance and stability, it can generate even the largest websites in seconds. Furthermore, Hugo is highly customizable, allowing you to tweak configurations and apply themes easily via the hugo.toml file. This makes it popular for sites such as blogs, documentation, etc.
In this post, we’ll cover the basics of Hugo and show you how to quickly push and deploy your website using GitHub Workflows within seconds!
Benefits of Hugo
Hugo is known widely for its following advantages:
- Super fast
- Easy to configure
- Customizable
- Built-in SEO-friendly features
Setting up Hugo
Setting up Hugo is very easy, as shown by the below steps:
Step 1: Install Hugo
For Debian-based distributions:
sudo apt update

sudo apt install hugo
For Arch Linux-based distributions:
sudo pacman -Sy hugo
Hugo binaries are also availible at: Hugo’s GitHub Releases
Step 2: Generate a local site
By running the following command:
hugo new site hugo-site
Step 3: Initialize Git
By initializing Git we will be able to add themes as submodules and keep track of our changes.
For more details, check out my blog on Git and GitHub.
git init
Step 4: Add a theme of your preference
The best thing about Hugo is that you can choose the way your site looks.
There are a lot of themes available at Hugo Themes.
After choosing your theme, add it as a submodule with:
git submodule add github-url-to-theme themes/theme-name
For Example:
We will be using PaperMod for this demo.
git submodule add https://github.com/adityatelange/hugo-PaperMod.git themes/PaperMod

git commit -m "themes: Add PaperMod"
Step 5: Enable your theme
In your hugo.toml:
theme = "PaperMod"
You will now see that upon Hugo regenerating your site, the theme will be applied.
Before continuing with our guide, it’s important to understand how Hugo’s file structure works.
When you run hugo new site hugo-site, Hugo generates a folder called hugo-site with several subfolders.
Content
The content folder holds the main content of your site. For example, in a blog site, all your blog posts (in Markdown format) will usually go in content/posts.
Public
The public folder is generated when you run hugo server or hugo. It contains the fully rendered static website, mostly HTML, CSS, and JS files, ready to be served. You generally do not manually edit this folder.
Static
The static folder holds files that should be passed to the client as-is, without processing. Hugo copies everything from static directly into the root of the public folder. For example, a file placed at static/about/profile.jpg will be accessible at https://your-site-url/about/profile.jpg.
Step 6: Generating a new post
To generate a new post, run:
hugo new posts/first.md
This generates a markdown file at content/posts where you add your content.
For example,
# Hello guys this is my first post!
Step 7: Test your changes
Hugo allows you to run a local server by running the command:
hugo server
This command creates a server that launches an accessible URL, usually https://localhost:1313.
Hugo automatically reloads the page when you make changes.
Setting up GitHub Workflows
Hugo seamlessly integrates with GitHub workflows and allows you to deploy your site for free!
Step 1: Creating a GitHub repository
Create a GitHub repository on your account with its name in the following format:
<yourusername>.github.io
For example, for my username it would be:
realahnet.github.io
Step 2: Pushing your changes to the repository
After staging and committing your changes, push your changes to your GitHub repository.
For more details, check out my blog on Git and GitHub.
git remote add origin https://github.com/<your-username>/<your-username>.github.io
For example, for my username it would be:
git remote add origin https://github.com/realahnet/realahnet.github.io
Push your changes to the repository.
git push -u origin master
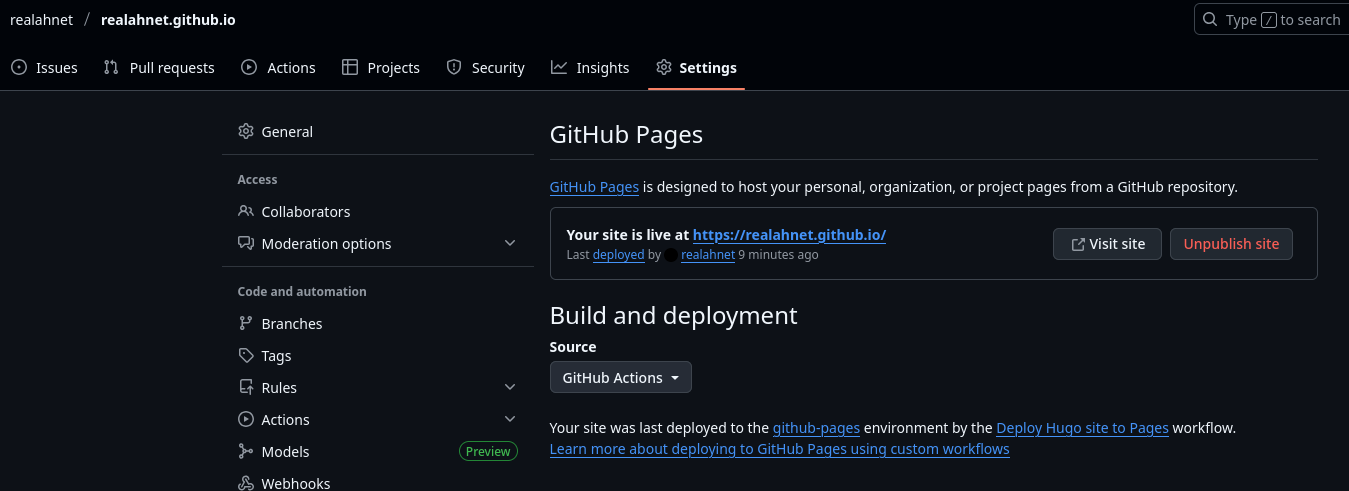
Step 3: Setup GitHub Pages
Navigate to the settings tab in your GitHub repository page.
Spot the section called “Build and Deployment.”
Change the source to GitHub Actions as shown in the image below:
Step 4: Setup GitHub Workflow
GitHub expects a specific directory structure in order to configure your actions.
.github/workflows
It contains a yml file, which specifies all the configuration for how the project builds and deploys.
Luckily for us, Hugo already has a premade actions profile on GitHub.
Navigate to the
Actionstab and click on “New workflow.”Search for
hugoin the search bar.Click on the Hugo workflow that shows up:

Click on configure. Now a yml file will pop up.
Look for the env section:
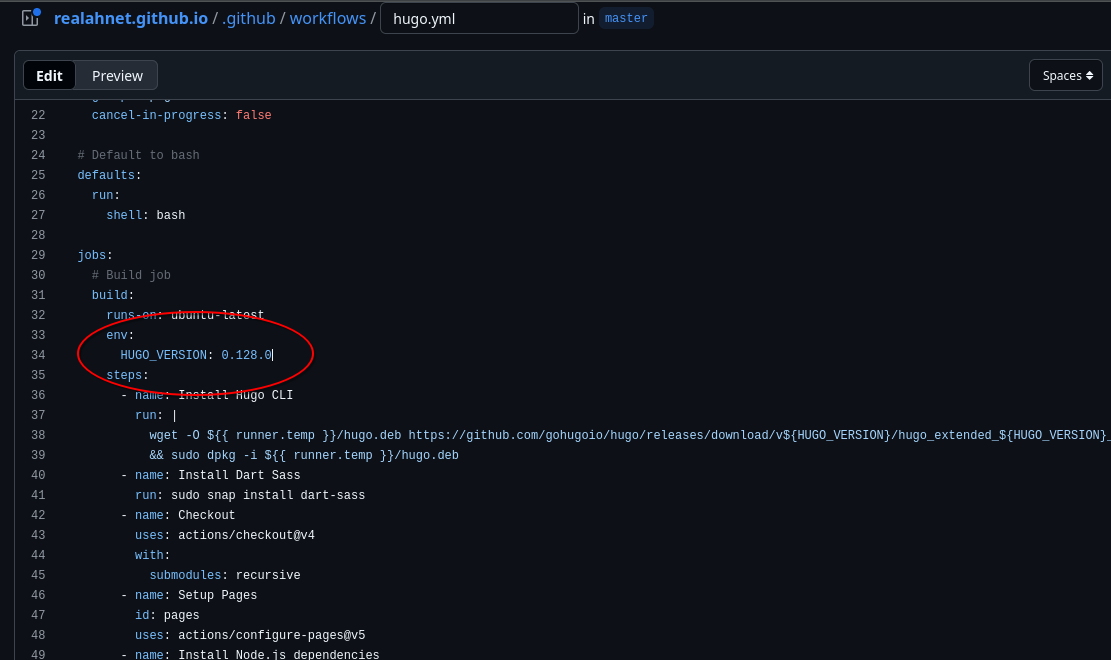
- Change the version to the latest Hugo version available at Hugo’s GitHub Releases.
For Example
env:
HUGO_VERSION: 0.152.2
Click on commit changes and choose an appropriate commit message.
After committing, the GitHub action will start running.
Once the deployment is successful, your site will be deployed at:
<your-username>.github.io
Replace your-username with your username
Step 5: Correcting baseURL
Hugo requires you to set a baseURL inside hugo.toml. This is basically the URL of your website.
Just update it at the top.
For Example
baseURL = 'https://realahnet.github.io'
Summary
Hugo is the perfect choice for anyone looking forward to building and deploying a fast, simple, and elegant site. With its amazing ability for customization and different variety of themes, it is a favorable choice among developers and students.